> ## Documentation Index
> Fetch the complete documentation index at: https://docs.firstresonance.io/llms.txt
> Use this file to discover all available pages before exploring further.
# Manage procedure steps
> Add steps to a procedure, configure them as content or datagrid steps, and copy, nest, reorder, and locate them.
Steps are the units of work in a procedure. You add and arrange them while editing the procedure. For what a step is and how it becomes a run step on the floor, see the [procedure overview](/build-hardware/procedures#steps).
## Add a step
1. While editing a procedure, click **Add Step** at the bottom of the steps list, or hover over an existing step and use its **...** actions menu to **Add step below** or **Add child step**. The **Add Step** dialog opens on the **Create New** tab.
2. Enter the **Step Name** and choose the **Step Type**, Content or Datagrid. Optionally set a **Location** and toggle **Outside Processing Step**.
3. Click **Create Step**.
## Create a step from a PDF
You can turn a PDF into procedure steps instead of authoring them by hand.
1. While editing a procedure, click **Add Step** to open the **Add Step** dialog on the **Create New** tab.
2. Set **Step Type** to **PDF**.
3. Upload the PDF, then enter the pages to use in the **Pages** field, such as `1,2,3-5`.
4. Enter a **Step Name**, then click **Create Step**.
ION creates one step whose content is parsed from the pages you entered.
## Configure the step
Configure the step based on the type you chose.
Content steps hold written instructions. The content box supports text formatting: colors, lists, fonts, pictures, and tables.
To add a table, build it in Google Sheets and paste it in. Pasting from Excel copies the content but not the formatting.
### Attachments
Attach reference files to a step from the **Attachments** panel. Click **Browse files** to upload a file, or **Take a photo** to capture one. A STEP file (3D CAD model) can be previewed in place, so an operator can inspect the model without downloading it. On an image attachment, **Copy image** copies the image to your clipboard.
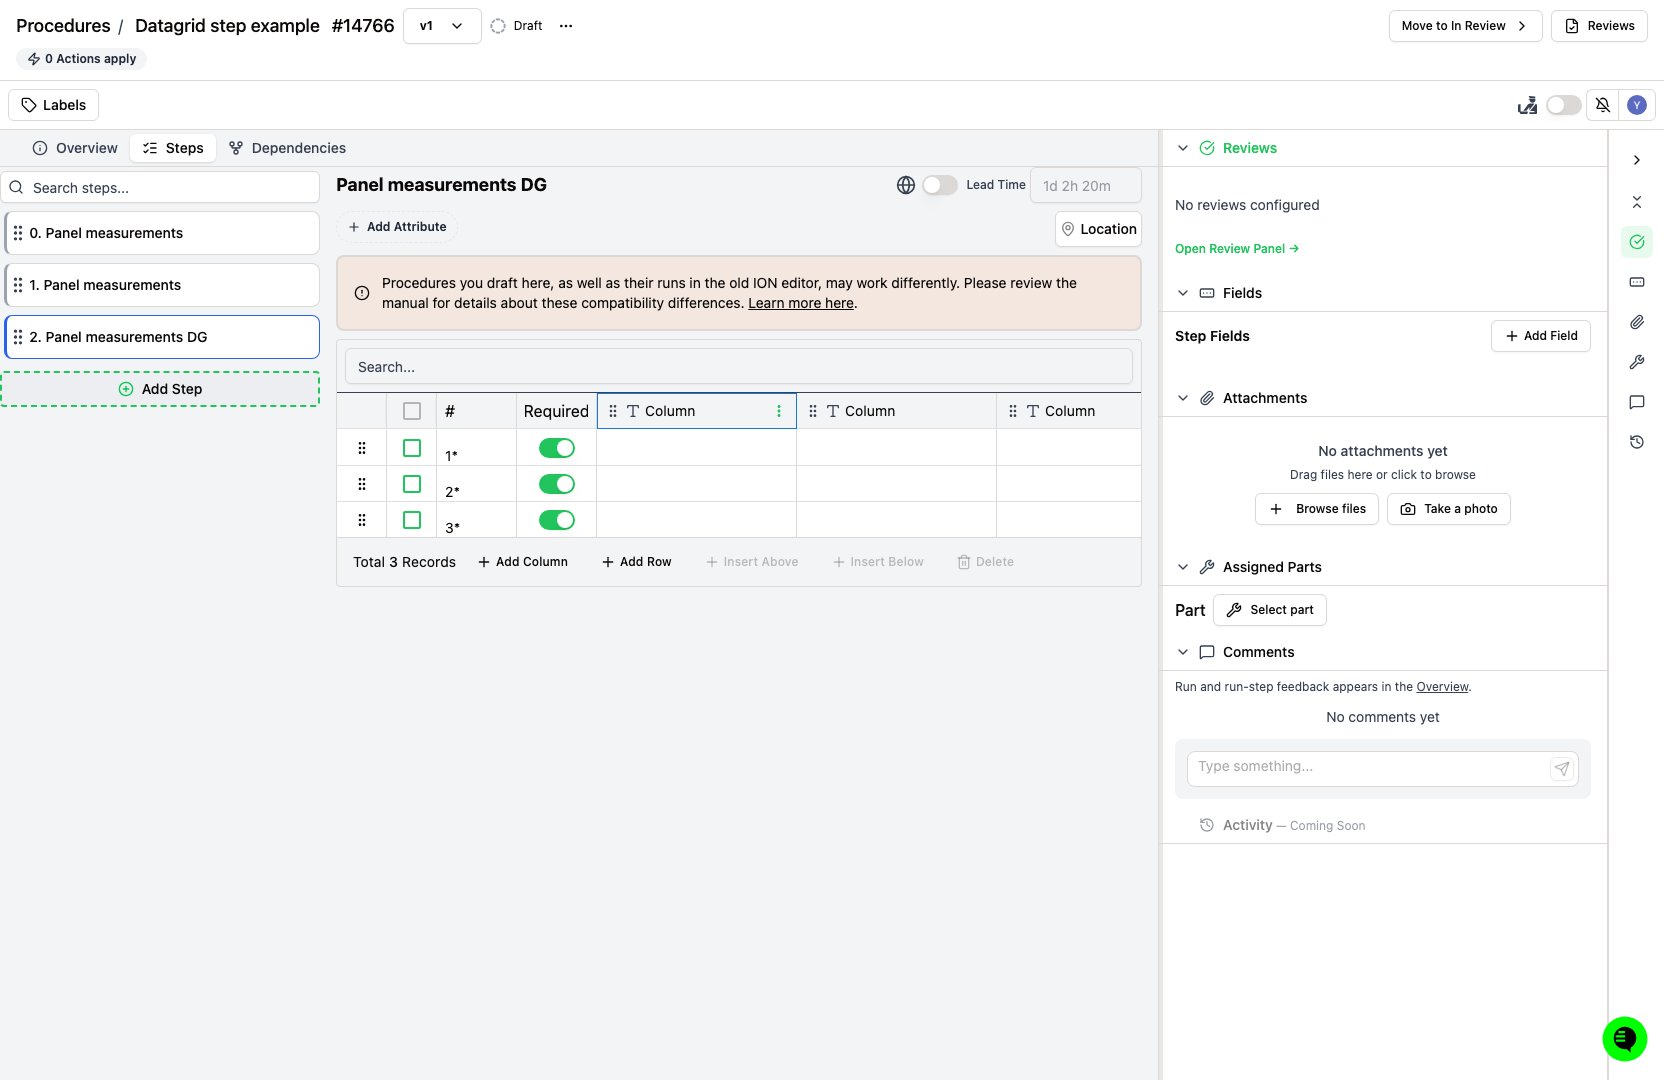
Datagrid steps collect tabular data. Each cell is a field an operator fills in when the procedure runs. You edit the grid's columns and rows while the procedure is a draft.
 ### Columns
A datagrid supports any number of columns.
* **Add a column**: click **Add Column** to add one at the end, or open a column's menu and choose **Insert column left** or **Insert column right**.
* **Name a column**: click the column header and enter a name.
* **Set the column type**: in the same header editor, choose the data type. Number columns take an optional unit, select and multiselect columns take a list of options, and signoff columns take a role.
* **Set a column read-only**: turn on **Read only?** so its cells can't be edited when the step runs.
* **Delete a column**: open the column's menu and choose **Delete column**.
* **Reorder columns**: drag a column by the handle in its header.
### Rows
A datagrid supports any number of rows.
* **Add a row**: click **Add Row** to add one at the end. With a row selected, click **Insert Above** or **Insert Below**.
* **Delete a row**: select the row and click **Delete**.
* **Reorder rows**: drag a row by its handle.
* **Require a row**: turn on the row's **Required** toggle to require it be filled in when the step runs.
### Cell values
While authoring, you can prefill text and number cells by editing them directly. Cells of other types are filled in when the step runs.
## Add fields to a step
Both step types collect operator input through data-collection fields, edited in the **Step Fields** section for the selected step while the procedure is a draft. For each field type and how number validations behave, see [Step field types](/build-hardware/procedures/step-field-types).
1. In the **Step Fields** section, click **Add Field**.
2. Choose the field's type from the type list, such as **Boolean**, **Number**, or **Signoff**.
3. Enter a field name, and optionally a description.
4. Set the field's behavior:
* Turn on **Required** to block step completion until the field is filled.
* Turn on **Allow "Not Applicable"** on a required field to let the operator confirm the field doesn't apply.
5. Configure any type-specific settings, such as a signoff role or select options.
To reorder fields, drag a field by its handle. To copy or delete a field, use the controls on the field.
### Set a step's lead time
Set a **Lead Time** on a step to record how long the work should take, entered as a duration such as `1d 2h 20m`. Step lead times roll up into the procedure's total. During a run, the step's time tracking compares logged time against this lead time.
## Copy a step
In the **Add Step** dialog, open the **Add Existing Step** tab and type the name of the step you want to copy into the **Search steps...** box. ION fetches existing steps that match, along with the procedure each will be copied from. Click a result to copy it into the procedure.
You can also duplicate a step in place. Hover over a step in the step list, open its **...** actions menu, and choose **Duplicate**.
To share one step across procedures and revise it in one place instead of copying it, use a [standard step](/build-hardware/procedures/standard-steps).
## Nest child steps
Create child steps by hovering over a step, opening its **...** actions menu, and choosing **Add child step**, or by dragging an existing step under another step. Steps show the number of child steps they have on a badge next to the step title. Click the badge to expand or collapse the child steps.
Steps can be nested up to five levels deep.
## Reorder steps
Drag a step by its handle to reorder the steps.
## Delete a step
Hover over a step in the step list, open its **...** actions menu, and choose **Delete step**. A step that has a dependency can't be deleted: remove its [step dependencies](/build-hardware/procedures/procedure-dependency-manager) first.
## Tag a step's location
Set a step's [location](/build-hardware/locations-and-work-centers) from the **Location** field when creating the step, such as "Testing Lab" or "Paint booth 1".
## Old ION compatibility
Content steps support rich formatting, such as to-do lists, headers, tables with merged and colored cells, toggles for hidden content, code blocks, block quotes, callouts, and a table of contents.
### Columns
A datagrid supports any number of columns.
* **Add a column**: click **Add Column** to add one at the end, or open a column's menu and choose **Insert column left** or **Insert column right**.
* **Name a column**: click the column header and enter a name.
* **Set the column type**: in the same header editor, choose the data type. Number columns take an optional unit, select and multiselect columns take a list of options, and signoff columns take a role.
* **Set a column read-only**: turn on **Read only?** so its cells can't be edited when the step runs.
* **Delete a column**: open the column's menu and choose **Delete column**.
* **Reorder columns**: drag a column by the handle in its header.
### Rows
A datagrid supports any number of rows.
* **Add a row**: click **Add Row** to add one at the end. With a row selected, click **Insert Above** or **Insert Below**.
* **Delete a row**: select the row and click **Delete**.
* **Reorder rows**: drag a row by its handle.
* **Require a row**: turn on the row's **Required** toggle to require it be filled in when the step runs.
### Cell values
While authoring, you can prefill text and number cells by editing them directly. Cells of other types are filled in when the step runs.
## Add fields to a step
Both step types collect operator input through data-collection fields, edited in the **Step Fields** section for the selected step while the procedure is a draft. For each field type and how number validations behave, see [Step field types](/build-hardware/procedures/step-field-types).
1. In the **Step Fields** section, click **Add Field**.
2. Choose the field's type from the type list, such as **Boolean**, **Number**, or **Signoff**.
3. Enter a field name, and optionally a description.
4. Set the field's behavior:
* Turn on **Required** to block step completion until the field is filled.
* Turn on **Allow "Not Applicable"** on a required field to let the operator confirm the field doesn't apply.
5. Configure any type-specific settings, such as a signoff role or select options.
To reorder fields, drag a field by its handle. To copy or delete a field, use the controls on the field.
### Set a step's lead time
Set a **Lead Time** on a step to record how long the work should take, entered as a duration such as `1d 2h 20m`. Step lead times roll up into the procedure's total. During a run, the step's time tracking compares logged time against this lead time.
## Copy a step
In the **Add Step** dialog, open the **Add Existing Step** tab and type the name of the step you want to copy into the **Search steps...** box. ION fetches existing steps that match, along with the procedure each will be copied from. Click a result to copy it into the procedure.
You can also duplicate a step in place. Hover over a step in the step list, open its **...** actions menu, and choose **Duplicate**.
To share one step across procedures and revise it in one place instead of copying it, use a [standard step](/build-hardware/procedures/standard-steps).
## Nest child steps
Create child steps by hovering over a step, opening its **...** actions menu, and choosing **Add child step**, or by dragging an existing step under another step. Steps show the number of child steps they have on a badge next to the step title. Click the badge to expand or collapse the child steps.
Steps can be nested up to five levels deep.
## Reorder steps
Drag a step by its handle to reorder the steps.
## Delete a step
Hover over a step in the step list, open its **...** actions menu, and choose **Delete step**. A step that has a dependency can't be deleted: remove its [step dependencies](/build-hardware/procedures/procedure-dependency-manager) first.
## Tag a step's location
Set a step's [location](/build-hardware/locations-and-work-centers) from the **Location** field when creating the step, such as "Testing Lab" or "Paint booth 1".
## Old ION compatibility
Content steps support rich formatting, such as to-do lists, headers, tables with merged and colored cells, toggles for hidden content, code blocks, block quotes, callouts, and a table of contents.
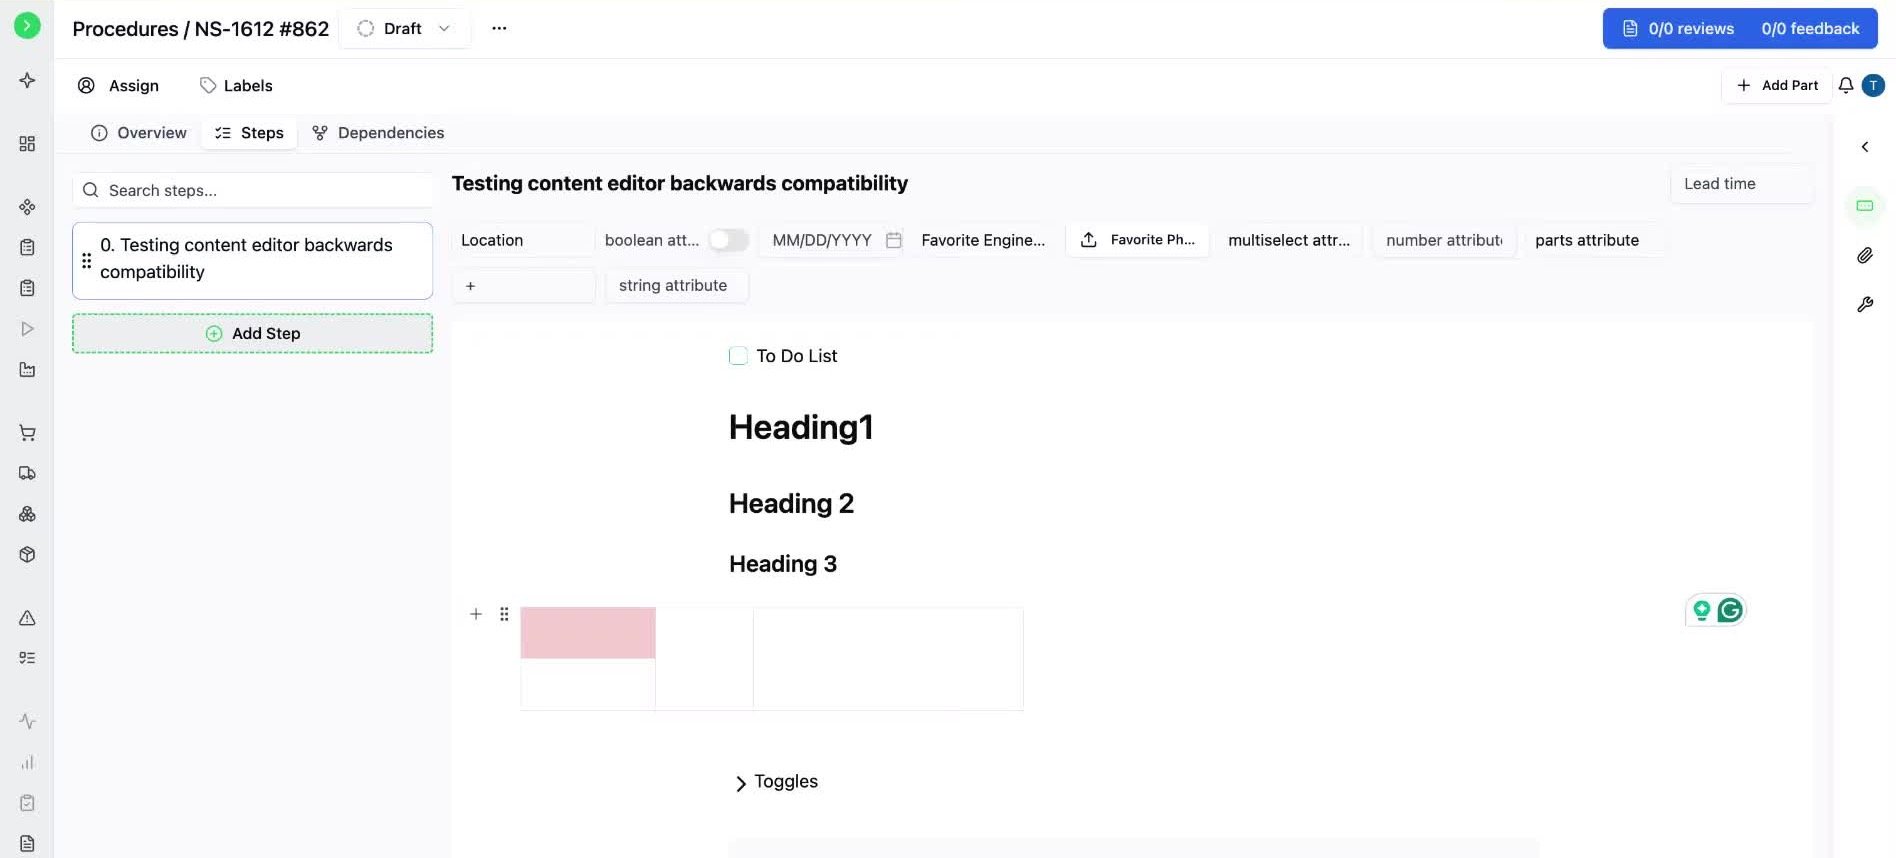 A procedure you draft here, along with its runs, can behave differently in Old ION. Rich formatting does not carry over: to-do lists lose their checkboxes, headers and tables lose their formatting, and toggles, code blocks, block quotes, callouts, and the table of contents do not appear.
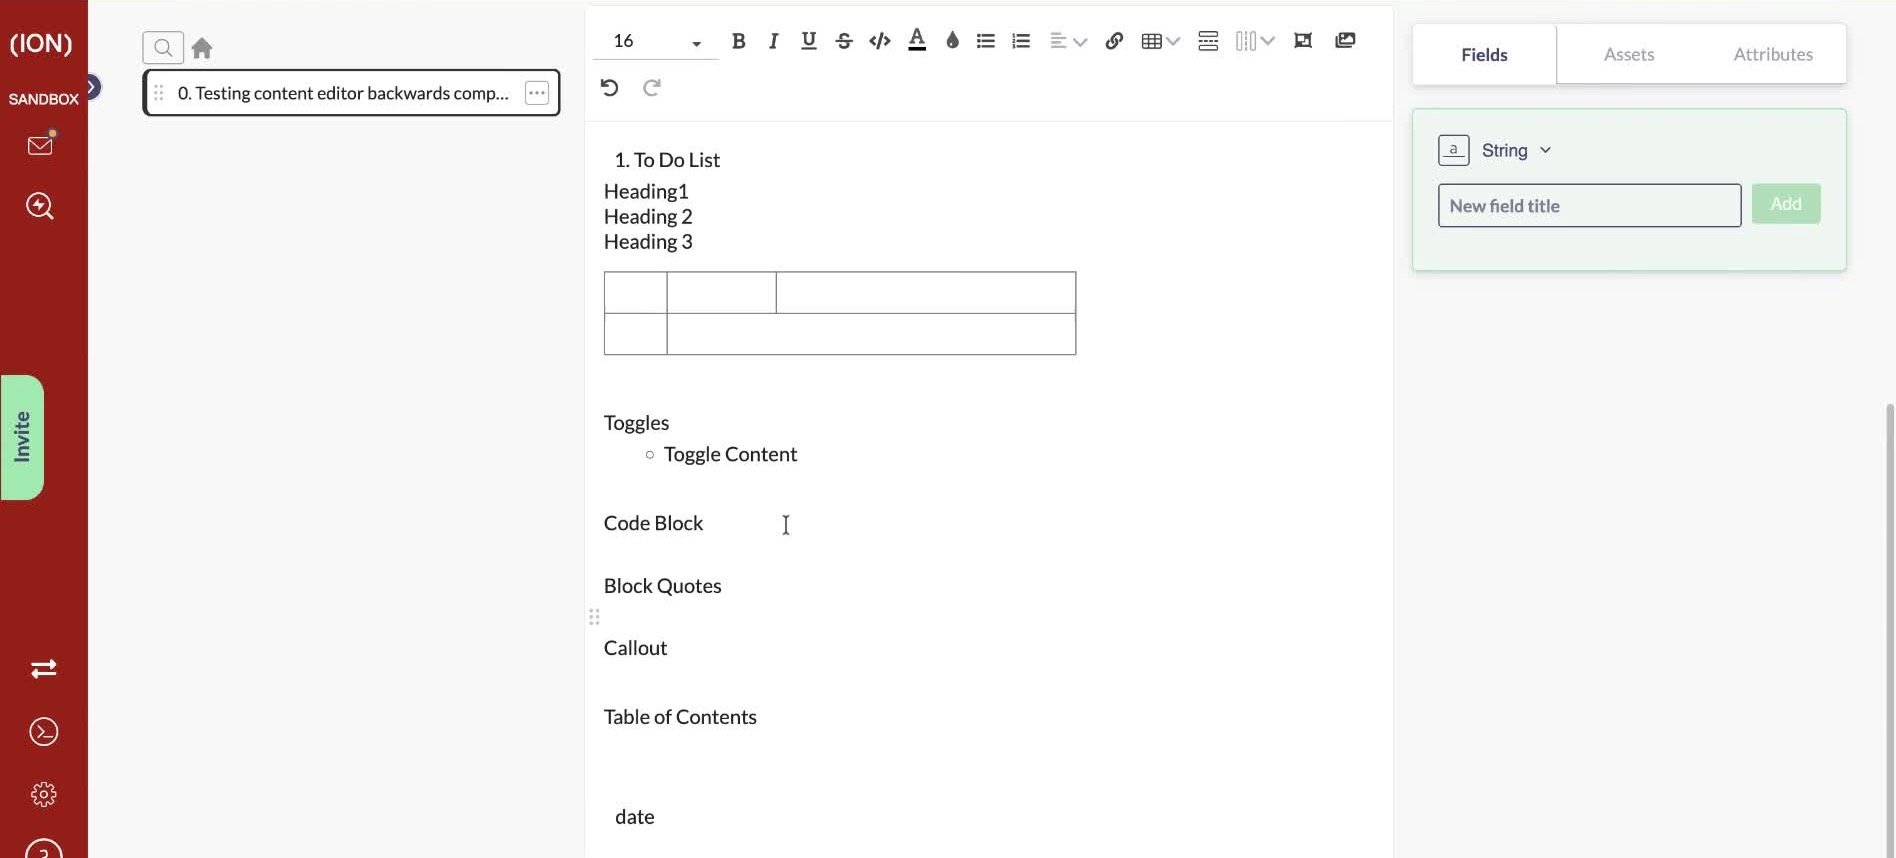 If your team still works in Old ION, check how a procedure renders there before relying on this formatting in production work instructions.
## Related
* [Step field types](/build-hardware/procedures/step-field-types)
* [Manage standard steps](/build-hardware/procedures/standard-steps)
* [Manage step dependencies](/build-hardware/procedures/procedure-dependency-manager)
If your team still works in Old ION, check how a procedure renders there before relying on this formatting in production work instructions.
## Related
* [Step field types](/build-hardware/procedures/step-field-types)
* [Manage standard steps](/build-hardware/procedures/standard-steps)
* [Manage step dependencies](/build-hardware/procedures/procedure-dependency-manager)