> ## Documentation Index
> Fetch the complete documentation index at: https://docs.firstresonance.io/llms.txt
> Use this file to discover all available pages before exploring further.
# Manage inventory records
> Add, move, adjust, and review inventory records on the Inventory page, and act on several at once.
Day-to-day inventory work happens on the **Inventory** page. Adding a record, moving it, adjusting its quantity, and reviewing its history each run from there. For consolidating, dividing, and scrapping stock, see [Merge inventory](/manage-supply-chain/inventory/merge-inventory), [Split inventory](/manage-supply-chain/inventory/split-inventory), and [Scrap inventory](/manage-supply-chain/inventory/scrap-inventory).
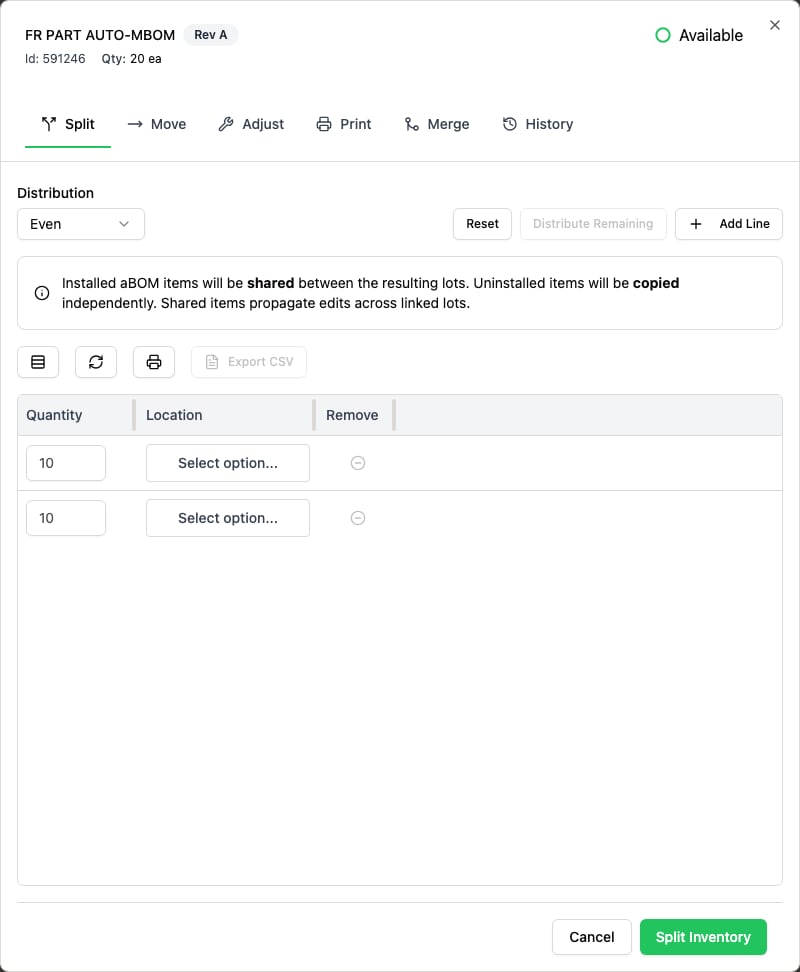
Most single-record actions open from the same place: on the **Inventory** page, click a record to open the **Part Inventory Actions** dialog, then pick a tab: **Split**, **Move**, **Adjust**, **Print**, **Merge**, or **History**. **Split** is hidden for a serial-tracked record, and **Merge** appears only when your organization has inventory merge turned on.
 ## Add inventory
Add stock that didn't come through receiving, such as an opening balance or a manual correction.
1. On the **Inventory** page, click **Add Inventory**.
2. In **Create New Inventory Item**, set the **Part Number** and **Quantity**.
3. Set the **Location**. For a lot-tracked part, enter a **Lot Number**; for a serial-tracked part, enter a **Serial Number**.
4. If your org uses intent options, set the intent. Depending on your settings, intent can be required.
5. Click **Create Item**.
## Move inventory
1. On the **Inventory** page, open a record and select **Move**.
2. Search for and select the destination location.
3. Confirm the move. The record's location updates, and the move is recorded in its history.
## Adjust a quantity
Use an adjustment to correct a record's on-hand count.
1. On the **Inventory** page, open a record and select **Adjust**.
2. Set the **New Total Quantity**. To scrap part of the record instead, set the **Quantity to Scrap**.
3. Record a reason, then save. For scrapping stock as a workflow, see [Scrap inventory](/manage-supply-chain/inventory/scrap-inventory).
## Delete a record
Deleting a record removes all of its units from inventory. It doesn't scrap them or record a transaction, so use it for a record created in error rather than for stock you've consumed or scrapped.
1. On the **Inventory** page, open a record and select **Adjust**.
2. Click **Delete All Inventory**, then confirm. The record is removed permanently and can't be recovered.
Deleting a record permanently removes it and every unit on it. This can't be undone.
The **Delete All Inventory** control appears only if your permissions allow deleting inventory.
## Filter the Inventory page
Open **Filters** in the **Inventory** page toolbar to narrow the list. It's the same filter builder the rest of ION's tables use; for how to build and save a condition set, see [Build a filter](/build-hardware/parts/inventory-search#build-a-filter).
Alongside the inventory's own fields, the field picker offers **Issues**, so you can narrow to the inventory an issue touches. Searching for `issues` in the picker surfaces the whole issue filter surface as paths, such as **Issues > ID**, **Issues > Title**, and **Issues > Issue disposition type > Title**. To list only inventory that has an issue, filter on **Issues > ID** with **Is null** set to **False**.
The same field set appears on the Tools inventory table, which shares the inventory filter definition.
## View transaction history
To see every transaction against a record, open it on the **Inventory** page and select **History**. The history lists each action, such as received, moved, split, merged, installed, and uninstalled, with its actor, timestamp, and location.
## Act on several records at once
Selecting records on the **Inventory** page reveals a toolbar of bulk actions:
* **Move** sends the selected records to one location.
* **Print Barcodes** prints labels for the selected records. See [Print labels](/build-hardware/labels-and-scanning/printing).
* **Generate SNs** generates serial numbers for the selected records.
## Add inventory
Add stock that didn't come through receiving, such as an opening balance or a manual correction.
1. On the **Inventory** page, click **Add Inventory**.
2. In **Create New Inventory Item**, set the **Part Number** and **Quantity**.
3. Set the **Location**. For a lot-tracked part, enter a **Lot Number**; for a serial-tracked part, enter a **Serial Number**.
4. If your org uses intent options, set the intent. Depending on your settings, intent can be required.
5. Click **Create Item**.
## Move inventory
1. On the **Inventory** page, open a record and select **Move**.
2. Search for and select the destination location.
3. Confirm the move. The record's location updates, and the move is recorded in its history.
## Adjust a quantity
Use an adjustment to correct a record's on-hand count.
1. On the **Inventory** page, open a record and select **Adjust**.
2. Set the **New Total Quantity**. To scrap part of the record instead, set the **Quantity to Scrap**.
3. Record a reason, then save. For scrapping stock as a workflow, see [Scrap inventory](/manage-supply-chain/inventory/scrap-inventory).
## Delete a record
Deleting a record removes all of its units from inventory. It doesn't scrap them or record a transaction, so use it for a record created in error rather than for stock you've consumed or scrapped.
1. On the **Inventory** page, open a record and select **Adjust**.
2. Click **Delete All Inventory**, then confirm. The record is removed permanently and can't be recovered.
Deleting a record permanently removes it and every unit on it. This can't be undone.
The **Delete All Inventory** control appears only if your permissions allow deleting inventory.
## Filter the Inventory page
Open **Filters** in the **Inventory** page toolbar to narrow the list. It's the same filter builder the rest of ION's tables use; for how to build and save a condition set, see [Build a filter](/build-hardware/parts/inventory-search#build-a-filter).
Alongside the inventory's own fields, the field picker offers **Issues**, so you can narrow to the inventory an issue touches. Searching for `issues` in the picker surfaces the whole issue filter surface as paths, such as **Issues > ID**, **Issues > Title**, and **Issues > Issue disposition type > Title**. To list only inventory that has an issue, filter on **Issues > ID** with **Is null** set to **False**.
The same field set appears on the Tools inventory table, which shares the inventory filter definition.
## View transaction history
To see every transaction against a record, open it on the **Inventory** page and select **History**. The history lists each action, such as received, moved, split, merged, installed, and uninstalled, with its actor, timestamp, and location.
## Act on several records at once
Selecting records on the **Inventory** page reveals a toolbar of bulk actions:
* **Move** sends the selected records to one location.
* **Print Barcodes** prints labels for the selected records. See [Print labels](/build-hardware/labels-and-scanning/printing).
* **Generate SNs** generates serial numbers for the selected records.