The Parts Library lets you search across a part’s identifying fields, filter by fields such as status and tracking type, and navigate from a part to its on-hand inventory.

Search the Parts Library

The search bar at the top of the Parts Library, with the placeholder Search part #, description, revision, supplier part #..., matches against:
  • Part number.
  • Description.
  • Revision.
  • The part’s supplier part number.
  • Any supplier part number on the part’s linked suppliers.
Search matches a substring anywhere in any of those fields and is case-insensitive, and a part matching in any one of them is returned. To filter on custom attributes or other fields, use the filter panel instead.
Typing a partial value works: BRKT returns every part with BRKT anywhere in one of the fields above, such as its part number or its description.

Filter the Parts Library

Open the filter panel from the Parts Library toolbar. Common filters: Filters compound. Each filter you add narrows the list further.

Build a filter

The filter panel is the same builder ION uses on most of its tables, including Inventory, Runs, Issues, Procedures, Kits, Purchases, Suppliers, Tools, Standard Steps, and the user list in Settings. What you learn here carries over. Each condition takes a full-width line for the field, with the operator, the value, and the remove control on the line beneath it. A nested field shows its leaf name with the path to it as a muted prefix, so a long path can’t crowd out the value.
  1. Click Add condition and pick the field to filter on.
  2. Pick the operator, then enter or select the value.
  3. Repeat for each condition you need.
  4. Click Filter to apply the set. The panel closes and the table updates.
Nothing you build takes effect until you click Filter, so you can add, edit, and remove conditions freely and the table stays as it was. Closing the panel without clicking Filter discards the conditions you staged.

Enter several values with Is in

The Is in operator matches a field against a list of values. On a field with no picker, such as a serial number or another free-text identifier, the value control reads Add values… and opens a box for entering them:
  • Type a value and press Enter, or type a comma, to add it as a removable chip. The field keeps focus, so you can enter values one after another.
  • Paste a comma-separated list to add several at once.
  • Remove a chip with its X, or press Backspace in an empty field to drop the last one.
  • Blank and duplicate values are ignored.
The control’s trigger reads Selected (N) once values are in. On a whole-number field, only whole numbers within the 32-bit range are accepted, and anything else stays in the field for you to correct. On a per-column filter, Apply stays disabled while the list is empty, because an empty list matches nothing.

Combine conditions

The Match control at the top of a group decides how its conditions combine: All requires every condition, Any requires at least one. The rail beside the conditions reflects the choice, reading Where on the first condition and then and or or. To express something the flat list can’t, click Add condition group for a nested group with its own Match control and its own remove control. Separate groups always combine with All.
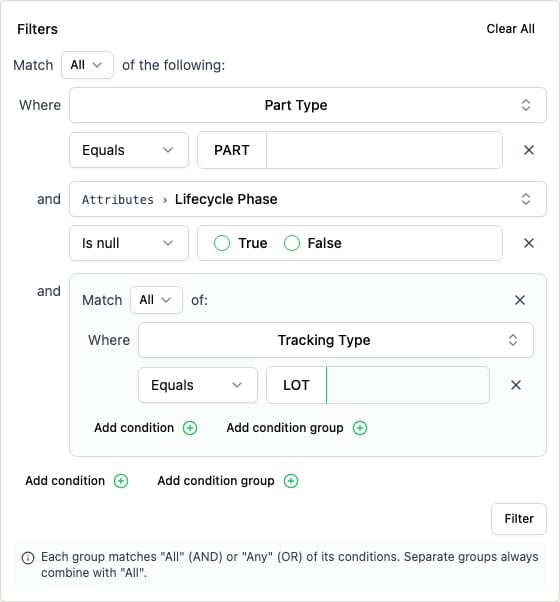
Filter panel titled Filters with Clear All, a Match All of the following control, a Part Type Equals PART condition, an Attributes Lifecycle Phase Is null condition with True and False options, a nested condition group with its own Match All control containing Tracking Type Equals LOT, Add condition and Add condition group buttons, and a Filter button

The filter builder with two conditions and a nested condition group. The second condition filters on a custom attribute, so its field shows the leaf name after a muted path prefix.

Clear All is the exception to that. It empties the whole set and applies the change straight away, closing the panel and returning the table to unfiltered.

Save a filter view

You can save a filter combination as a view. With a filter set applied, open the bookmark dropdown in the table toolbar and click Save Current View, then name it. The view appears in that same dropdown for reuse. To manage a saved view, use Edit View, Duplicate View, Share View, or Delete View in the same dropdown.

Reach inventory from a part

Every part page has an Inventory card. It opens with summary counts (Quantity Available, Quantity Installed, Quantity WIP, and Quantity On Order) above a table of that part’s inventory:
  • ID: the inventory line’s identifier.
  • Status: the inventory line’s state, such as available, installed, or WIP.
  • Location: where the inventory sits.
  • Quantity: the on-hand quantity for that line.
Click the ID of any row to open that inventory record on the Inventory page, where you can move, adjust, split, merge, or print it. For more information, see Manage inventory records. Every inventory line references its part. From the Inventory page, such as when you scan a serial number on the floor, you can navigate up to the part record to see its specs, BOM relationships, and procedures.

Export a selected set

Filter or search to the parts you want, then select rows with their checkboxes. A toolbar appears showing how many items are selected. Click Export CSV in the table toolbar to download the selected rows as a CSV file for an external workflow. The export includes the table’s visible columns; the button is disabled until at least one row is selected. To change many parts at once, such as reclassifying, re-pricing, or importing in bulk, use ION Importers, which previews the effect before applying it.

Search over the API

For integrations and scripts, Search parts covers the GraphQL surface. The API exposes the same filter fields as the UI, but the search bar’s match across several fields at once is assembled by the app: over the API you combine the fields you want yourself, such as part number, description, revision, and supplier part number.