Create a kit
- In ION, go to the Kits page.
- Click Create Kit. ION creates the kit in Draft and opens it on the Kitting page.
- In Request info, set the Destination, where the parts go once the kit is delivered. A destination is required before picking can start. Setting it doesn’t move any parts; the kit’s location updates to the destination when the kit is delivered.
- Optional: set the Current location, where the kit’s parts physically are. Setting it moves the parts to that location.
- Add the parts you need with Add Part to Kit. Its menu also offers Add Multiple Parts to Kit, Add All from mBOM, and Import Parts from CSV. Set each line’s quantity inline.
- Click Submit Request to hand the kit to the inventory team. A kit needs at least one part before it can be requested.
When there isn’t enough inventory to fulfill the kit, ION shows a shortage
alert. While the kit is in Draft, you can select the short lines and click
Split Kit to move them into a new Draft kit, so the rest of the kit can
proceed.
Fulfill a kit
To open the Kitting page, click Kitting on the Kits page, or click a kit number to open one kit directly. Filter the kit request queue with Open, My kits, or All.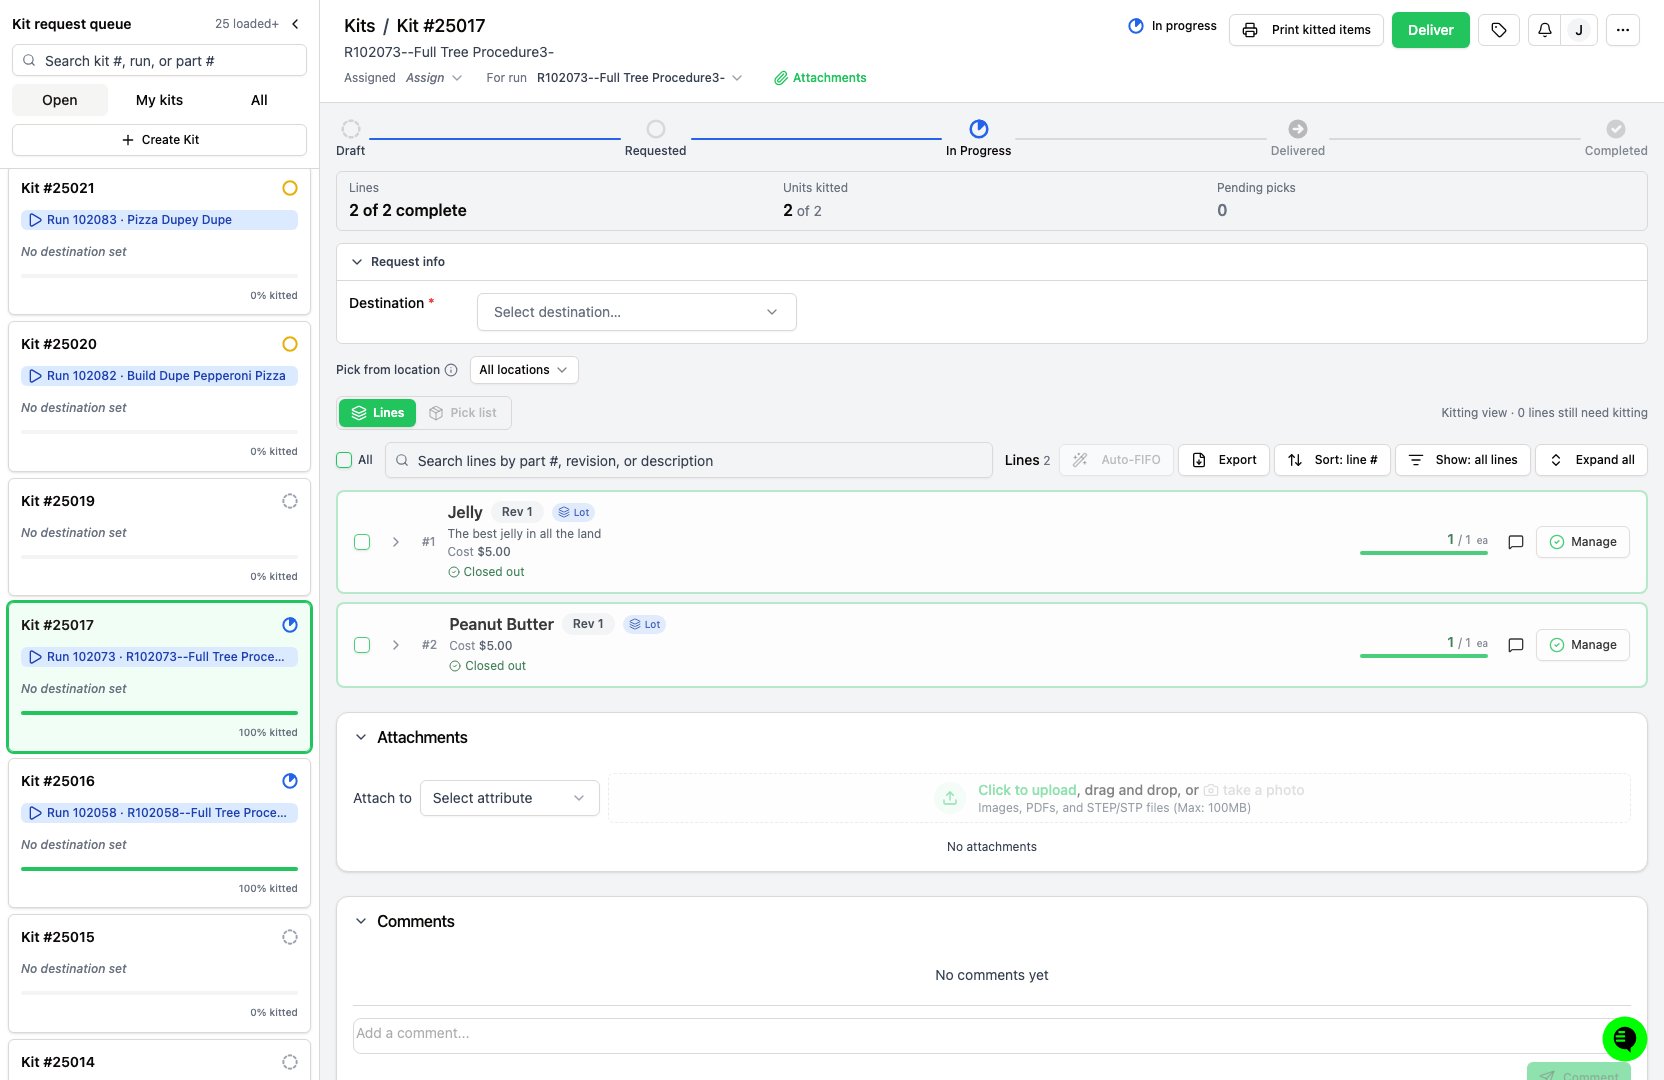
The Kitting page with an In Progress kit selected: the request queue, the kit's request info, and the Lines and Pick list views.
- Click Start Picking. The kit must have a Destination first; if it’s missing, clicking the button takes you to the field.
- Optional: set Pick from location to limit manual picks and Auto-FIFO to one location and its sub-locations. To hide lines you can’t fulfill there, check Only available here.
-
For each line, click Kit. Set the quantity, pick the lots or serials to use in Pick from inventory, and click Add to pending. A candidate from a part other than the line’s own carries a chip naming why it’s acceptable: Interchangeable revision, Substitute, Substitute revision, or Acceptable part. Choose a Pick strategy:
- FIFO (Oldest first by receipt date) preselects candidate inventory to cover the quantity, drawing on the same pick list Auto-FIFO uses so the two controls select the same physical units. When no inventory is pickable, nothing is preselected.
- Manual (You choose row-by-row) preselects nothing.
- Pending picks collect in a bar at the bottom of the pane. Click Finalize pick · create pick session to commit them, or Discard to drop them.
- To fill every open line with the oldest inventory first instead, click Auto-FIFO in the lines toolbar, which kits immediately with no pending step. See Auto-FIFO coverage.
- When every line is fully kitted, click Deliver. The button reads Complete for a kit that isn’t tied to a run, and stays disabled until the kit is 100% kitted.
- Select all ticks every row currently in view.
- The search box filters rows by part number, revision, lot or serial, inventory label, and location.
- Print list opens a paper walk sheet in a new window, grouped by stop with an empty checkbox per row. It prints the rows you have checked, or every row currently in view when nothing is checked.
The row checkboxes are the kit’s pick-tracking state, so Select all marks every visible row
picked. On a fully kitted kit that surfaces the ready-to-deliver banner.
Auto-FIFO coverage
Auto-FIFO tells you how far it can get before you commit it. When available inventory covers every open line, the button reads Auto-FIFO and one click kits the whole kit. When some lines fall short, the button carries a count of the lines it can fully kit, such as Auto-FIFO (4/8), and clicking it opens a confirmation instead of kitting straight away. The confirmation lists each short line and why it falls short. Setting Pick from location narrows what Auto-FIFO can draw on. Click the confirm button to kit the lines it can and leave the rest short, or Cancel to change something first. When Auto-FIFO would fill a line from an interchangeable revision rather than the line’s own part, the same confirmation says so first, because Auto-FIFO commits immediately.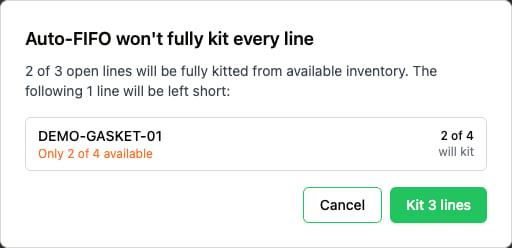
Auto-FIFO on a kit that stock can't fully cover: two lines will be fully kitted and one left short.
Auto-FIFO appears only while the kit is In Progress. It’s unavailable
when there’s no inventory left for it to pick.
How candidate inventory is ranked
The pick list puts the kit’s own site first and works through receipt date inside it. Stock under the same root location as the kit ranks ahead of stock anywhere else, oldest first, and off-site stock is drawn on only once the local stock can’t cover the line. For example, newer stock in the kit’s building outranks older stock in another one. A kit with no location set ranks by receipt date alone. Both the FIFO pick strategy and Auto-FIFO rank candidates this way.What inventory can be picked
Candidates are inventory that is Available or On Order with quantity available. Anything else can’t be picked. Inventory in WIP is not pickable, with one exception: depending on your settings, WIP inventory linked to a purchase order line through an outside-processing run step can be kitted, both in the picker and by scanning. For more information, see Allow kitting of WIP inventory for outside processing and Send a step to outside processing.See where a line’s inventory is
Each kit line carries an availability summary. Click the summary to open the inventory breakdown, which groups the stock behind the line by status: Available by location, WIP · In Active Runs by run, On Order by purchase order, and Kitted by kit. The breakdown covers the line’s part and any substitutes it can draw on, and it opens in every kit status, so on-order and WIP stock stays visible after the kit leaves Draft. While the kit is in Draft, a line also offers View inventory, a read-only viewer for its lots, locations, and quantities.Split off what’s left to pick
When a kit stalls part-way through picking, you can close it at what’s already picked and move the rest to a new kit, so the parts you have can go to the floor.- On the Kitting page, open the kit and click More actions (⋯).
- Select Split off remaining.
- In Split off remaining, confirm the split.
Split off remaining appears only while the kit is In Progress and less than 100% kitted. It’s also withheld while picks are pending, so finalize or discard them first.
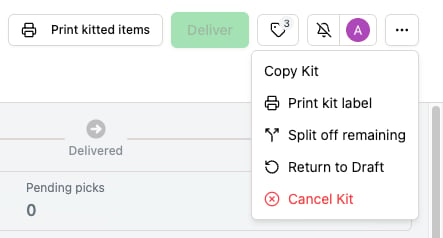
Split off remaining in the More actions menu of a kit that is In Progress and partly kitted.
Un-kit inventory
To return kitted inventory to where it came from, expand a line’s kitted rows with the chevron, then remove a single row or click Remove all. Replace removes a row and reopens the picking form so you can pick different inventory. To delete whole lines, select them and click Remove from Kit; any inventory kitted to them is un-kitted back to its source location.Batch fulfill several kits
To fulfill several kits at once, select them on the Kits page and click Batch Fulfill. The table shows a row per part and a column per kit. Click a kit’s fulfillment cell, pick the inventory to use, and confirm with Apply Selection.Fill several kits at once
There’s no batch Auto-FIFO. To fill several kits in one pass, plan a pick run, which walks the floor once for all of them. Auto-FIFO works on one kit at a time.Bulk edit several kits
To change the same field on several kits at once, select them on the Kits page and click Edit.- Click Add field and pick the field to set: Current location, Delivery location, Assignee, or Status.
- Set its value. Repeat for each field you want to change.
- Click Apply to
<n>kits.
ION won’t reopen a kit and move it in the same action, and won’t set a delivery location in the
same action that marks kits Delivered. Apply the first change, then the second.
Track a kit’s inventory
The Current Location column on the Kits page shows where a kit’s inventory sits. To move all of the kit’s inventory to one location, set Current location in Request info on the Kitting page. Delivering the kit moves the inventory to its Destination.Comment on a kit line item
- On the line, open its comments to display the Comments panel.
- In the Add a note for this line item… field, type your comment. You can format the text and
@-mention a user to notify them directly. - Post the comment.
Add labels to a kit
Labels are shared tags you apply across ION to group related records. For creating and deleting labels in the shared library, see Labels. To add a label, click Labels (or Add labels when the kit has none), then type in the Search or create labels… box and select it.Attach files to a kit
Attach files such as images, PDFs, and STEP/STP files, up to 100 MB each.- On the kit, find the Attachments section.
- Add a file by dragging it onto the upload area, clicking to browse, or taking a photo on a device with a camera.
When a file is attached through a file-type custom attribute, the delete dialog offers Remove from attribute (keeps the file but detaches it) and Delete permanently.