In ION, open the run and click Kits in the run header. The dialog lists every kit tied to the run with its status, destination, and fulfillment progress, and each kit number links to the kit on the Kitting page.

Request a kit from a run

  1. In the run’s Kits dialog, click New Kit Request.
  2. Add the parts you need:
    • To pull them from the run’s aBOM, pick an Auto-fill source, either All unfulfilled parts or a single run step, and click Apply.
    • To add one part at a time, click Add part… and search the aBOM. Check Include substitutes to also list substitute parts, marked SUB.
  3. Check each row’s Destination, the location the kit is delivered to. ION prefills it from the run step’s location, falling back to the run inventory’s location when the run step has none. Parts added outside a run step use the run inventory’s location directly. A row with no prefill shows Select destination… and blocks Submit Request until you set one.
  4. Click Submit Request.
ION creates one kit per destination. Rows that share a destination go into the same kit, and the footer states the result before you submit, such as Creates 2 kits (2 destinations). To apply one destination to many rows at once, select the rows and click Set destination in the toolbar. Rows for the same part that end up sharing a destination collapse into one row with their quantities summed.
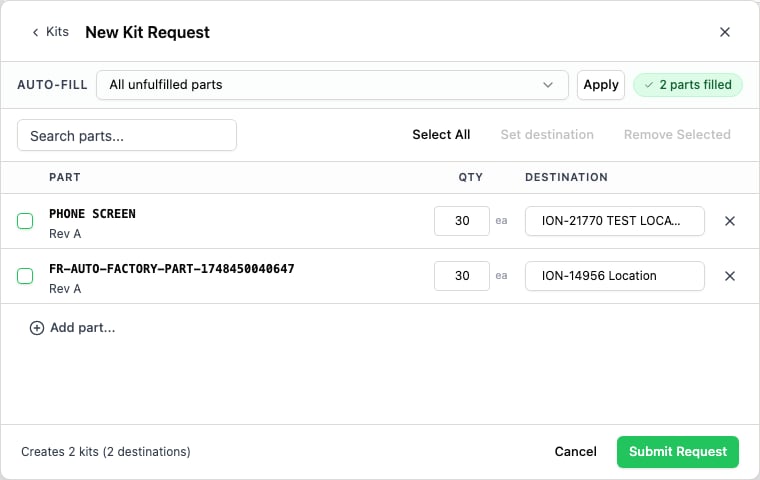
New Kit Request dialog with two auto-filled parts, each assigned a destination, and a footer reading Creates 2 kits (2 destinations)

The New Kit Request dialog after Auto-fill. Each part needs a destination, and ION creates one kit per destination.

As soon as parts are kitted, they’re subtracted from inventory and reserved for the run, so you can plan assemblies without double-counting. You don’t have to fully kit every part. The inventory team fulfills the kits on the Kitting page. See Create and fulfill kits.

What Auto-fill adds

Auto-fill saves you from adding each line by hand. The source you pick decides what it pulls in:
  • All unfulfilled parts adds every aBOM build requirement that isn’t fully installed, filling each part’s outstanding quantity (required minus what’s already installed). Parts already complete are skipped.
  • A single run step adds only that run step’s build requirements.
Auto-fill then subtracts what an existing kit already holds for the run, plus anything you’ve already staged in the dialog, so it never re-requests a part that’s covered. A part the run’s kits fully cover is dropped from the fill, and a partly covered part is filled at its remaining shortfall. A badge reports how many parts were filled, so you can tell a skipped part from a missing one. Apply stays unavailable until the run’s kit inventory finishes loading. Each made-on-assembly part carries an MOA badge, and serial- and lot-tracked parts carry S/N and Lot badges. On a run with a large aBOM, some parts might not appear in the list or auto-fill; a notice appears when that happens, so add any missing parts by hand. You can also associate a kit with a run after the fact: open the kit on the Kitting page and set For run in the kit header. The kit then appears in the run’s Kits dialog.

Install kitted parts on a run step

When a run has kits, you can install their contents against a run step’s part install requirements in one action. Open the run step and find the Part installs section in its right rail. When the run’s kits hold parts for that step, a banner reads N parts kitted for this step. Click Install all from kit on the banner. ION installs the kitted inventory against the run step’s open build requirements and counts each install toward that run step. Once everything the run step requires is installed from the kit, the run step’s install requirement is satisfied. The same banner appears in Part Installs (aBOM), which View all in the Part installs section opens. There it reads N parts kitted for this run and installs against the run’s part rather than one step. Turning on Edit Mode hides it.