Prerequisites
- The runs you want to batch must follow procedures whose step structure matches enough to have shared (“sibling”) steps. Two runs of the same procedure version are the canonical case.
- Permission to modify run batch membership.
Batch runs from the runs table
Both entry points open the same picker:- One run: click Add to batch in the run’s Batch column.
- Several runs: select them, then click Batch in the floating toolbar.
- Search Existing batches by name. Select one to add the runs to it.
- To create a batch instead, type a name and select the Create "" row. Leave the box empty and select Create new batch to create one with no title.
- If the name you typed is already taken, the create row warns Merges into Batch #, and selecting it opens a Merge into Batch #? confirmation stating how many runs are already there and how many you’re adding. Click Add to Batch # to go ahead, or Cancel.
Open the batch manager
Once a run is in a batch, open the batch manager from inside the run: click the batch pill in the run header, then click Manage batch. If the run is no longer in a batch, the dialog shows “This run is no longer in a batch.”Add runs to a batch
- In the batch manager, click Add a run to the batch.
- Search runs by title or ID in the dropdown. Before you search, the list holds only runs that aren’t in a batch yet. Searching also reaches runs held by other batches, each labeled in , so you can move one here without going to the other batch first. Runs that are complete or canceled never appear.
- Multi-select the runs you want, then click Add N to batch in the dropdown footer.
- If any selected run is leaving another batch, a confirmation asks whether to move the runs between batches and lists each one with where it moves from and to. Click Move runs to go ahead. Unbatched runs in the same selection are added with no prompt.
Set or rename the batch title
Click the title row below the dialog header to enter edit mode. Type the new title, then click Submit. The title shows up alongside the batch ID in the run header and run list. If another batch already uses the title, the field warns that Batch # already uses it and that saving will move this batch’s runs into it. Submitting opens a Merge into Batch #? confirmation before anything is written. Confirming moves this batch’s runs into the other batch, and the batch you renamed stays behind with no runs.Remove a run from a batch
In the runs list, click Remove on the run you want out, or Remove & go to run to remove it and open it. ION asks you to confirm. After you confirm, the run continues independently from that point forward. It keeps any sign-offs and redlines it accumulated while batched.Unbatch every run
Click Unbatch all in the dialog footer. ION asks you to confirm before clearing the batch. After confirming, every run leaves the batch and continues independently. The batch itself is dissolved.Batch propagation
When you change a step inside a run that belongs to a batch, ION looks at every other run in the batch and finds sibling steps: steps in those runs that match the same step in the batched procedure. The change propagates to every sibling found:- Sign-offs: completing or signing a step propagates the same completion to every sibling step.
- Redlines: redline changes propagate to siblings. For how redlines are merged across runs, see Redline a run.
- State changes: skipping, failing, or reopening a step propagates to siblings.
Cascade an aBOM install across the batch
Part installs are not cascaded automatically. Adding a build requirement to a run that belongs to a batch adds it to that run alone, and its card in the Part Installs (aBOM) tool carries a This run only badge. To cascade it, turn on Edit Mode and click Apply to N runs in batch on the card. One action adds the requirement to every sibling unit that doesn’t already carry it. Cascading is offered only on the top-level aBOM of a batched run opened from a run step. Inside a sub-assembly’s aBOM, a requirement stays on the run you added it to.Assign aBOM parts across the batch
On a run that belongs to a batch, the Part Installs (aBOM) tool installs parts into every batched run at once, so you assign inventory one time for the whole batch instead of opening each run. Open the tool from the run step’s Part Installs (aBOM) panel: click View all. Each build requirement card carries a Batch assignment section in place of the single-run installer. Expand the card to work with it.Pick an anchor and auto-assign
The section opens on an anchor picker and an Auto-assign button. The picker’s label depends on how the part is tracked:- Anchor lot for a lot-tracked part.
- Starting serial for a serial-tracked part.
- Anchor inventory for a non-tracked part.
LOT-A · 372 available.
To fill every run’s requirement from the anchor onward, click Auto-assign. The anchor takes priority: each run’s primary assignment draws from the anchor lot or inventory first, and the assignment spreads to other available inventory only after the anchor runs out. To assign each run by hand instead, open the caret next to Auto-assign and choose Assign manually.
If the anchor holds less than every run needs, a warning states how much is available and confirms that Auto-assign fills what it can while the rest needs manual assignment.
Stage each run’s kit inventory
When runs in the batch have their own reserved kit inventory for the part, a callout reads “Kit inventory is available for N of M runs.” Click Assign from kits to stage each run’s reserved lot or serial into that run’s row. Each run draws only from its own kit, so one run’s kit can’t fill another run’s row. If a kit holds less than the run requires, ION stages what the kit has and leaves the rest for manual assignment. Review and edit the staged rows before installing.Review and adjust the assignment table
After assigning, the table lists one row per batched run. Change any row before installing:- In the Inventory cell, pick a different lot, inventory record, or serial. Clear an assignment with its X.
- For lot and non-tracked parts, edit the quantity in the Qty cell against the run’s requirement, shown as of N.
- Assign more inventory to one run through additional legs, or add a serial to a serial row.
For a lot or non-tracked part, you can assign more than a run requires as long as real stock covers it. The quantity cell shows an Over-installing (N required) hint, where N is the requirement. Over-installation is available only when the run’s requirement lives on a single run step. If a quantity exceeds available stock, the cell shows Only N available and blocks the install instead.
Assign by reference designator
When the build requirement carries reference designators, each run’s row lists one entry per designator in place of the Inventory and Qty cells. This applies to lot-tracked parts as well as serial-tracked ones.- Pick the inventory for each designator separately.
- Installing writes one unit against each designator, tagged with that position, so the run step reads every designator as assigned.
- Uninstalling targets the install behind a single designator.
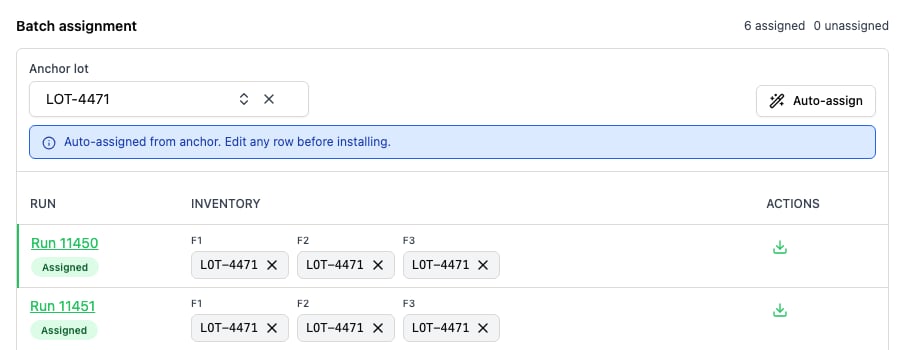
Batch assignment for a lot-tracked requirement carrying the reference designators F1, F2, and F3. Each run's row lists one entry per designator instead of an Inventory and Qty cell.
Install and uninstall across the batch
Install the staged assignments from the table footer:- Click Install N assigned to install every assigned row. A results bar then reports the installed, failed, and still-unassigned counts.
- Install a single run with the download action in its Actions cell.
- Click Unassign all to clear every staged assignment that is not yet installed. Installed rows are not affected. ION asks you to confirm.
- Click Uninstall all to remove every install in the batch. ION asks you to confirm. Installed serials return to an editable Assigned state with their serial numbers kept. Installed lot and non-tracked rows return to unassigned.
- Uninstall a single run with the trash action in its Actions cell.